Monday, June 4, 2012

Long Countdown Timer for Android

I will be showing you how to create a long countdown timer for Google Android development.

Place this in your onCreate method for the activity with the countdown. In your layout, create a TextView and give it an id of 'txtTimer'.
    @Override
    protected void onCreate(Bundle savedInstanceState) {
        super.onCreate(savedInstanceState);
        setContentView(R.layout.activity_main);

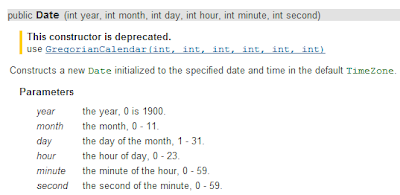
        Date date = new Date(115,4,26,12,0,0);
        long dtMili = System.currentTimeMillis();
        Date dateNow = new Date(dtMili);
        long remain = date.getTime() - dateNow.getTime();

        new CountDownTimer(remain, 1000)
        {
            @Override
            public void onFinish()
            {
                //Action for when the timer has finished.
                TextView tv = (TextView) findViewById(R.id.txtTimer);
                tv.setText("Timer has Finished");
            }

            @Override
            public void onTick(long millisUntilFinished)
            {
                //Action for every tick of the countdown.
                TextView tv = (TextView)findViewById(R.id.txtTimer);
                tv.setText(timeCalculate(millisUntilFinished/1000) + " Countdown");
            }
        }.start();
    }  


First off we need to implement Androids CountDownTimer. The first parameter is the amount of milliseconds it will take to finish and the second parameter is the interval to countdown at (1000 represents 1 second).


Set the variable 'date' to the Date you want the countdown to end at. Keep in mind Java starts at year 1900, the month January starts at 0 and the hours are military time. In the following example I'm making a countdown to May 26, 2012 at 12PM.


Next, I created a separate method that converts long milliseconds into a string output. Credit to the Stack Overflow question for the following code. http://stackoverflow.com/questions/3749297/countdown-timer-in-android
   public String timeCalculate(long ttime)   
   {  
     long days, hours, minutes, seconds;  
     String daysT = "", restT = "";  
   
     days = (Math.round(ttime) / 86400);  
     hours = (Math.round(ttime) / 3600) - (days * 24);  
     minutes = (Math.round(ttime) / 60) - (days * 1440) - (hours * 60);  
     seconds = Math.round(ttime) % 60;  
   
     if(days==1) daysT = String.format("%d day ", days);  
     if(days>1) daysT = String.format("%d days ", days);  
   
     restT = String.format("%02d:%02d:%02d", hours, minutes, seconds);  
   
     return daysT + restT;  
   }  

Friday, April 27, 2012

Running Python from Command Prompt

Want to run Python on Windows from command prompt? This is a tutorial to set it up. Basically what we will be doing is adding in the Path of the install location of Python to the Windows Environment for command prompt to locate it.

Step 1:

Download Python, As of this writing, version 2.7 is the stable version of Python, so I would recommend downloading that based whether your computer is 32x or 64x.

Once the file has been downloaded, run the installer. Once complete, move to Step 2.

Step 2:

Now to set the PATH in the Windows environment.

    Windows XP:

    - Right click "My Computer" and select Properties.


      - Click on the "Advanced" tab at the top and select "Environment Variables" button.


        - In the list titled "System Variables" scroll down until you see the variable "Path". Select the line and press the "Edit" button underneath. In the pop-up window, click on the second textbox called "Variable value:"  and go to the end of the text. Add the install path directory, if its the default path add this text to it: ";C:\Python27". (Don't forget the delimiter ';' before the path.) Then click "OK"


    Windows Vista/7:

     - Click the Start button and right click on Computer. Now click properties in the dropdown as seen                                                       below.


- In the System Settings, press the "Advanced System Settings" link to the left. In the following pop-up press the "Environment Variables" button. Next, in the Environment pop-up, use the second list to find the variable called "Path", select that and press the edit button. Now as seen below, Edit the Variable value by adding the install path directory, if its the default path add this text to it: ";C:\Python27" to the end of the textbox. (Don't forget the delimiter ';' before the path.) Click "Ok" when complete.


Step 3:
Now we are able to run Python from command prompt.
First, open up command prompt:
Windows XP: Click Start and use "Run", Type "cmd" and hit enter.
Windows Vista/7: Click start and type "cmd" and hit enter.

Type in "python" into the window and you should get the following meaning its setup correctly. Now you can run python.


Friday, April 22, 2011

Boot Windows with Multiple Cores

Want to greatly improve the initial loading time of your Windows PC? By default, Windows will only boot using a single core. As long as your computer has a 2 or more core processor, I will show you how to get the most out of them.

Windows XP:
Lets begin by clicking on 'start' in the bottom left and clicking "Run". In that pop-up, type "msconfig", click "ok" and you should get a pop-up similar to the following image. Then click on the "BOOT.INI" tab at the top. Next you will need to press the "Advanced Options..." button. and should see the pop-up similar to the image to the left. Now you should check the check box before "/NUMPROC=" and set the drop-down box to the highest number. This means that your computer will now boot using the number of cores specified.


Windows Vista / 7:
Lets begin by clicking on 'start' in the bottom left and typing "msconfig", click enter and you should get a pop-up similar to the following image. Then click on the "Boot" tab at the top.


Next click on "Advanced options..." and you should see something similar to the following image:


Now, check the box that says "Number of processors:" and then click the drop-down box beneath it and specify how many cores you want to boot from.

Note: If you do not see the options in the previous images, then you are only running a single core processor. Also note that every computer is different. This may help some of you and other may see no effect.

Wednesday, July 28, 2010

How to change the file extension of a file in Windows 7

The following will describe how to rename a file with a different file extension. This is quite simple, but easy to miss.

First, open up control panel and click Appearance and Presentation. Then follow as the image below. Click 'Folder Options'. Then click the 'View' tab at the top. Now, scroll down just a little bit to were it says 'Hide Extensions for known file types' and uncheck that box next to it and click the 'OK' button at the bottom.


Now that the setting has been fixed, you can go to your file, right click it and go to 'rename'. There you can rename your file and add any file type extension to the end.

NOTE: Many file types can become damaged if not renamed correctly or to an off format. If converting audio files or picture files you may want to search for an open source converter program.

Tuesday, May 4, 2010

DreamScene for Windows 7 (Video Desktop Background)

You probably haven't heard of DreamScene since it was a Windows Vista Ultimate Extra, but what it does now is it plays a video file as your desktop background for Windows 7 computers. Unfortunately it only plays WMV files so you may need a video file converter (I prefer Prism Video Converter, its free and converts most video files to wmv). DreamScene does not play audio when you are on a desktop, just the visuals. From what I've seen of this DreamScene so far, there is no file size limit, so play a movie if you prefer. Though your hundreds of desktop icons may get in the way and hope you are good at lip reading.

You can download the file from this site. Around mid-page, click the image of a hard drive with a blue arrow pointing down at it to start the download. Just ignore the stupid advertisements.

Once downloaded run the exe file and click the enable button. If you ever want to shut off DreamScene just open the exe file again and click disable. Just as a note for when it enables, It will add a registry file and will reset your explorer so don't be alarmed when your desktop resets.

You cannot add the video file from the control panel, but what you will have to do is right click the video file and click the "Set as Desktop Background" button as shown below. Enjoy!


UPDATE: This program isn't fully functional. When I run a select few programs, DreamScene doesn't reload the video and you will have to reset the background.

Wednesday, January 20, 2010

Fixing bad Starcraft graphics on Windows 7


Here is a sample picture of the bad graphics that me and most others have been getting with Windows 7.

First go to your desktop screen. Right click anywhere on the screen. Go to 'new ->;' 'Text Document' and name it whatever with '.txt' file extension.

Now double click the file to bring up notepad and type in the following:

taskkill /f /IM explorer.exe
C:\"Program Files (x86)"\"Starcraft"\"StarCraft.exe"
start explorer.exe

Where the second line is the folder location of where you installed Starcraft. You will need to keep the quotation marks on that line as well for this to work.


Now save the file and close notepad. On the desktop, right click the file and rename it to whatever you want with a '.bat' file extension. If the file image doesn't change into the image on the left you will need to change some settings around. You can fix that by reading my other tutorial here. If the file image did change to the one above, then double click the file and it will automatically load Starcraft with clean graphics.

NOTE: Some anti-virus programs may think your '.bat' file is a virus. Make this file an exception when doing a computer scan to avoid complications.

Tuesday, January 5, 2010

Windows 7 Godmode

This may be a cheat code in a video game, but Windows 7 has made Godmode a cheat for its OS.

What you need to do is create a new folder anywhere on your computer and rename it to:
GodMode.{ED7BA470-8E54-465E-825C-99712043E01C}


Then double click it and you will get the control panel plus more placed inside a folder.