Wednesday, July 28, 2010

How to change the file extension of a file in Windows 7

The following will describe how to rename a file with a different file extension. This is quite simple, but easy to miss.

First, open up control panel and click Appearance and Presentation. Then follow as the image below. Click 'Folder Options'. Then click the 'View' tab at the top. Now, scroll down just a little bit to were it says 'Hide Extensions for known file types' and uncheck that box next to it and click the 'OK' button at the bottom.


Now that the setting has been fixed, you can go to your file, right click it and go to 'rename'. There you can rename your file and add any file type extension to the end.

NOTE: Many file types can become damaged if not renamed correctly or to an off format. If converting audio files or picture files you may want to search for an open source converter program.

Tuesday, May 4, 2010

DreamScene for Windows 7 (Video Desktop Background)

You probably haven't heard of DreamScene since it was a Windows Vista Ultimate Extra, but what it does now is it plays a video file as your desktop background for Windows 7 computers. Unfortunately it only plays WMV files so you may need a video file converter (I prefer Prism Video Converter, its free and converts most video files to wmv). DreamScene does not play audio when you are on a desktop, just the visuals. From what I've seen of this DreamScene so far, there is no file size limit, so play a movie if you prefer. Though your hundreds of desktop icons may get in the way and hope you are good at lip reading.

You can download the file from this site. Around mid-page, click the image of a hard drive with a blue arrow pointing down at it to start the download. Just ignore the stupid advertisements.

Once downloaded run the exe file and click the enable button. If you ever want to shut off DreamScene just open the exe file again and click disable. Just as a note for when it enables, It will add a registry file and will reset your explorer so don't be alarmed when your desktop resets.

You cannot add the video file from the control panel, but what you will have to do is right click the video file and click the "Set as Desktop Background" button as shown below. Enjoy!


UPDATE: This program isn't fully functional. When I run a select few programs, DreamScene doesn't reload the video and you will have to reset the background.

Wednesday, January 20, 2010

Fixing bad Starcraft graphics on Windows 7


Here is a sample picture of the bad graphics that me and most others have been getting with Windows 7.

First go to your desktop screen. Right click anywhere on the screen. Go to 'new ->;' 'Text Document' and name it whatever with '.txt' file extension.

Now double click the file to bring up notepad and type in the following:

taskkill /f /IM explorer.exe
C:\"Program Files (x86)"\"Starcraft"\"StarCraft.exe"
start explorer.exe

Where the second line is the folder location of where you installed Starcraft. You will need to keep the quotation marks on that line as well for this to work.


Now save the file and close notepad. On the desktop, right click the file and rename it to whatever you want with a '.bat' file extension. If the file image doesn't change into the image on the left you will need to change some settings around. You can fix that by reading my other tutorial here. If the file image did change to the one above, then double click the file and it will automatically load Starcraft with clean graphics.

NOTE: Some anti-virus programs may think your '.bat' file is a virus. Make this file an exception when doing a computer scan to avoid complications.

Tuesday, January 5, 2010

Windows 7 Godmode

This may be a cheat code in a video game, but Windows 7 has made Godmode a cheat for its OS.

What you need to do is create a new folder anywhere on your computer and rename it to:
GodMode.{ED7BA470-8E54-465E-825C-99712043E01C}


Then double click it and you will get the control panel plus more placed inside a folder.


Friday, January 1, 2010

Setting a Static IP on Windows 7 for basic home networks

Introduction

I have tried countless times to set up a static IP on my computer when online tutorials just don't help. I have finally learned the ways and hopefully this tutorial will help you.

NOTE: I am running Windows 7 32 bit. My router is a D-Link WRB-2310 and I am using a wireless connection.


Getting the Information

First off we need to get some network information. Open up your command prompt but clicking Start > Type in "cmd" > Select "cmd.exe"


Next, in the command prompt type "ipconfig /all" (without the quotations) and you will get some thing like this.... (I deleted some information from this picture that is not important to this tutorial but yours should be full of information.)


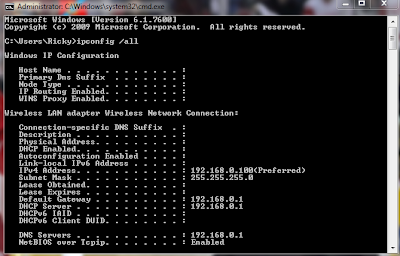
The information we need from this is the IPv4 Address, Subnet Mask and the Default Gateway. Write these numbers down somewhere because we will be using them later.

Now there is one more piece of information we need to set up a static IP Address. That is the DNS or the Domain Name System. There are multiple ways of getting this number.
1. Call your Internet Service Provider (ex: Comcast, AT&T) and ask them. If you proceed with this option you can skip the "Finding your DNS" part of this tutorial.
2. Follow these next steps.


Finding your DNS

First you need to open an internet browser. (Ex: Internet Explorer, Firefox, Chrome)
In the address bar at the top type in your default gateway that you found in the previous step..


By default the login for most routers is "admin" with no password.
Now that you can access your routers settings. Try to find a tab for Status. All routers are different so it may look different from mine. Go through your tabs and find information on your DNS. I have blanked out information I don't want disclosed in the following picture, but you should write down the number you get in the red box.


Setting up the Static IP

Now that you have all your information, we can now set up the static IP.

Go to Start > Control Panel > Network and Internet > Network and Sharing Center >"Wireless Network Connection (Connection Name)"


Now on the bottom left of the pop-up click "Properties".
On this pop-up single click "Internet Protocol Version 4 (TCP/IPv4)" Then click the "Properties".

Now is the time to plug in all the information we previously attained. Click the "Use the following IP address button" and then fill in your information. For the IP address field, the first 3 numbers in this field is the same as your default gateways first 3 numbers. Then the last number is a number you choose between the number 1-255. Though I would highly advice that you pick a number over 150 because when a new computer connects to your internet it is assigned a low number and you cant have the same number twice on a network. Now I know everyones network situation is different but when I could not figure out why my static IP address was not working, I found out that you should not fill in the Alternate DNS field, but your network may be different.


Click "Ok" and a pop-up will alert you about having multiple gateways and if you want to save. Click "Yes".

Now wait about 30 seconds for your network to recognize you new IP and you should be on your way with a static IP.


Conclusion

I hope this tutorial helped you set up your static IP. If you have any questions based on this topic, leave a comment and i will answer your question to the best of my ability.

If this tutorial did not help you, I would reccommend another site that may help.
Just select your Operating System and your router.